Tonight I would like to share a super fun, easy, family-friendly craft with you! When in Disney Parks, its almost expected that you wear a shirt with our favorite mouse! Unfortunately, Mickey shirts can be quite expensive...
but thanks to the DISBoards, I was able to come across this great idea for tie dying Mickey shirts!
I'll give you the quick rundown, but for full detailed instructions please visit this post on the DISBoards.
Here's what you'll need to start:
- Tshirts - 100% cotton will work best!
- Stencil of Mickey Head
- Dental floss & a Sewing Needle
- Soda Ash (find this near the tie dye kits)
- Tie Dye
- Rubberbands
- Plastic Bags
- Bleach Pen (FYI - Tide-to-go does not contain Bleach and will not work)
(sorry I don't have photos of each step... I didn't think to document the whole process)
Step 1: Trace Mickey shape on the Tshirt with a washable marker (I used crayola and it washed out great)
Step 2: Baste Stitch around the shape of Mickey with the Dental Floss - make your stitches small and close together for the best results.
Step 3: Pull both ends of the floss as tight as you can. The Mickey head will be scrunched and bunched:
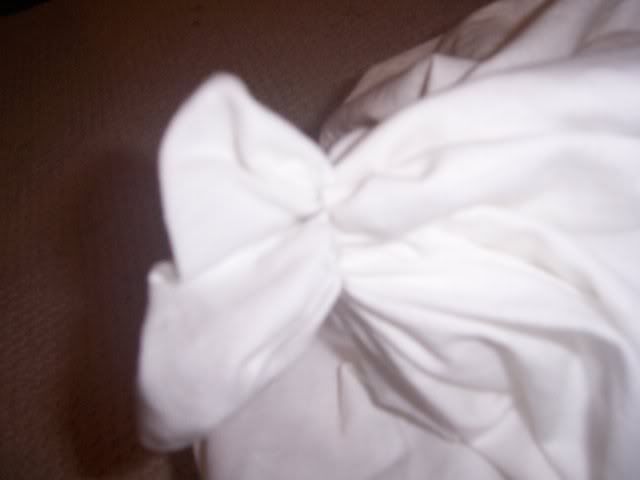
Step 4: Wrap 2 rubberbands around the floss line - This will prevent dye from getting to the Mickey outline!
Step 5: Soak in Soda Ash as directed in your product's instructions - usually about 20 minutes. Ring out excess water as much as possible
Step 6: Holding onto the puckered Mickey head in the middle of your shirt, start spinning until the entire shirt is wound up into a wheel shape. Wrap rubberbands around the wheel shape (it will look like pizza slices). Be sure to pull your Mickey head up and out of the spiral before continuing.
Step 7: Squirt your desired dye color onto only the Mickey head. Be sure to fully saturate your Mickey shape or you'll end up missing an ear! Also try to not get this color on the rest of the shirt. Then, wrap only the Mickey head in plastic
Step 8: Squirt the desired colors of dyes on the rest of the shirt in the pattern you want. Again, be sure to fully saturate the shirt and squirt into all the nooks and crannies. Then, wrap the shirts in plastic bags and let them sit as directed on your tie dye instructions (I let ours sit overnight)

Step 9: Unwrap the shirts and remove rubberbands. Rinse the dye out in a sink until the water runs clear - similar to when you dye your hair! Keep rinsing and ringing the shirts out until you feel like you've gotten most of the dye out. Then throw them in the washer with just a small bit of detergent. Let the shirts dry completely before moving on.


You may notice that the Mickey Heads aren't super clearly defined here. If that is the case with your shirts, continue on to the optional next step. If your Mickeys are surrounded by a nice clear un-dyed outline, then you are done! :)
Step 10: Slide a piece of plastic or cardboard inside the shirt. Using the bleach pen, outline the Mickey Heads with a thin line - the bleach will spread. Let the bleach dry, then wash the shirts again and ta-da! You have finished, custom Mickey shirts for a fraction of the cost - plus tons of fun memories from making them!


I'm actually hoping to make a few more of these for our upcoming trip (2 weeks from tomorrow!) but we've already made a pact to not wear them on the same day as each other. Matching shirts are cute when you have little kiddos, but its just too cutesy and matchy-matchy for us ;)
Please share any fun Disney crafts you and your family like to do - whether its leading up to a trip or just because!
Have a Magical Day today!
What a neat idea! Thanks for sharing it:)
ReplyDelete